Sunday, July 29, 2012

Ombré Glitter Nails

I see a lot of tutorials for nails on pinterest and it's been a long time since I did my own. I thought I'd do something different (and girly) for the weekend away with my family.


Here's my Pinterest Inspiration:


I just had to add this too (no I would never do this) but you have to admit, its pretty artistic:


My Ombre Glitter Nails:

\


First I picked a base color (pink), a glitter (silver), and fast drying coat (yes it works great!):


Did the first coat (2x):


(Kinda messy because I was in a hurry) ^


Then I added the glitter:


The "ombre" effect (which I clearly haven't mastered) is done by putting more on the top (or bottom- depending on which way you want it)...and working your way down. The idea is to have more on the top and on sprinkles of glitter going down the nail. Leave the bottom without glitter.


Monday, July 23, 2012

Jewelry Holder

Gotta LOVE Pinterest :o)

There's a bunch of ideas for holding jewelry out there. Question is, which one should you chose?! I think it all goes by space and how much time your willing to put into making it.

 I know I couldn't decide on my own so my amazing friend Jaimee helped me pick one AND make it :) (Thanks Hun!) - Yes, we made this forever ago but I haven't gotten around to posting.

She also helped me re-purpose a room in my house that wasn't being used. It's now my amazing craft/dressing room. What more could a girl ask for?! (More pictures on the room transformation to come).....


Here it is:


How to make it:

(Be Creative - Create one anyway you want!)

1. Pick a vase and spray paint it the color of your choice!

2. Fill the vase with sand, foam, etc. (This will be used to hold the branches)

3. Pick branches. (I was lucky enough to have a great friend bring me these beautiful birch tree branches).

4. Tie a rubber band towards the bottom of the branches to hold them together.

4. Once the paint dries on the vase you can add your branches and add your necklaces.

Note: Some branches are stronger than others. Proper placement of necklaces is important. If you do it incorrectly the whole thing will topple over :(    (whomp-whomp).

Please share your photos!!

Questions?! Email me @ couponsjmo@gmail.com

Enjoy :)

Saturday, July 21, 2012

No-Sew T-Shirt Halter

No-Sew T-Shirt Halter

Another inspired Pinterest Craft! There are so many things you can make with an old T-Shirt! Who knew!? So before you throw old an old T-Shirt check Pinterest or just google great ideas for transforming old shirts. I took the idea from a great blog called Wobisobi. Please visit their site for more information.

Please check back for updates, the shirt is not 100% complete.


Step 1: Start with an old T-Shirt. I found the boyfriends old shirt that accidentally shrunk in the dryer (Thanks Babe!).


Step 2: Cut off the sleeves:

Step 3: Cut a V in the FRONT of the shirt only. It's kinda hard to see but I cut the V to about where the arm holes end.


Step 4: Cut the BACK of the shirt with two cut out squares on either side (down to the bottom of the arm hole) and then cut the middle strip down the middle to create to strips. Please see the link above for a more detailed picture.


Step 5:  FLIP the shirt to FRONT side and tie the two strips together in a knot:


Step 6: Tie the strips from the FRONT to the strips in the BACK. Mine needs a little work (the bows are a bit too big and the back needs trimming).

The FRONT:


 (I might make the bows smaller, add ribbon, fix the right side (jagged edges) and cut the V deeper) Overall what do you think? Will you make one? Please share!

The BACK:


Thursday, July 5, 2012

Nautical Maritime Flag Bunting

Ever wonder how to make a Flag Garland, or "Bunting"?

These are great for parties or decorating the house (mine was a nautical maritime bunting for a clam bake). You can also make cute ones for a baby's room. Here are a few inspirational buntings:


Thanks to Sweet Tidings for the picture ^...

There are so many different styles you can create!

Here's one from The Fabric Shopper:


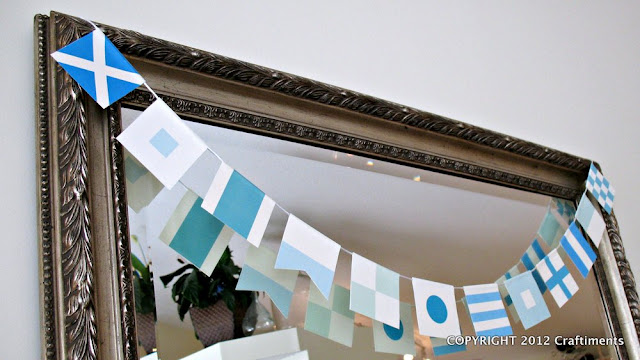
Mine was made using a Tutorial from Craftiments (Thanks Guys!):


Their lovely picture:

Craftiments.com:  Free Printable Maritime Signal Flag Bunting


Okay, so the picture isn't quality (someday I'll make enough to buy a great camera!) ....Yes the wallpaper is made up of ducks, and no I didn't pick it. This is a temporary home so we deal with the decor ;).....


First step: Print the tutorial from the Craftiments site or any site you chose. There are many versions (square, triangle, round, paper, fabric etc). The best part is you can find an idea and be creative to create your own masterpiece! I just happened to adore this idea as it fit with the theme of my party :)!

Second Step: I cut out the tutorial template that was provided and found a ribbon to match (I chose blue).


Third Step: I lined the paper along the ribbon to approximate the length I wanted it. The next step involves folding the paper over on the ribbon. I used a ruler to measure the flags so I could keep it even.. I tried...


Fourth Step: Using tape I first taped the ribbon to the center (inside portion) of the paper. You want the outside showing. Then I glued the inside and folded it over. The tape really helps to hold the  ribbon in place so it isn't sliding around after you glue it down. I made this mistake the first time because after I glued it down I realized the flag still moved. (Tip you can also use a cement glue if you have it).

You can see the line where you fold in half. I have this the wrong side up to show the line that's folded. The taping will be done on the reverse side.


Fifth Step: Continue to measure, tape, and glue and soon enough you'll have a bunting in about 15 minutes! (Tip: If you want them to be flat you can always rest books on them while they dry).


End Result....


Please let me know how yours came out! Did you make it from scratch with fabric? Have fun...

Wednesday, July 4, 2012

Watermelon Shark

I found this tutorial from Pinterest and knew I had to try it.

Ben and I had a Clam Bake at our house July 1st and thought the Shark Watermelon was very fitting.


This picture was after the shark insides and Swedish fish were gobbled up by guests ;)    The melon started to dry up because of the heat. Overall, it survived the length of the party.


Watermelon Shark Tutorial

Thank you   Sun Scholars and   Dollar Store Crafts for the Tutorials


Supplies:

1 Watermelon (oval shape)
Blue Jello (I skipped this step due to time) You could use anything blue for the water... I used a blue table cloth underneath. You could also use blue candy, blue saran wrap etc.
Swedish Fish
Blueberries for the eyes
Toothpicks
Melon (other fruits)
One small sharp knife
One large sharp knife
Tray to put the finished product on
Foil
Melon Baller or Spoon


Step One:

Pick which side of the watermelon would make a better head.    Mine had a slant on one side and the other side was dirty.


Step Two:

Cut the bottom of the shark at a slant.    This helps to make the shark head look like it's coming out of the water.    (You can see the bottom part in the background of this picture)


Step Three:

Cut a mouth by making a V shape and cut deep into the watermelon.    I scored it first to make sure it's what I wanted it to look like.    Set aside the bottom and the mouth (you will need this for the fin later).


Step Four:

Remove the inside of watermelon with a spoon, melon baller, etc.    Put this aside, you will need this to fill back in the watermelon or to use as a side dish (for us it was vodka infused watermelon for our party).    You may ask, why take it all out just to put it back in?    When you remove the watermelon and put it back in it gives the appearance of something being eaten, aka the guts.    It also makes it easier to carve the teeth and you need it to make the final product.


Step Five:


The next step involves carving the teeth (please be careful!)    This part is a little scary because you have to work with the sharp little knife and do some carving.    Score a line about 1" above the top and bottom "lip" of the shark.    This will be the line for the teeth length.    Then start carving off the melon skin. I tried my best (see below):


Step Six:

To make the teeth cut triangles from the white sections of the melon.    To make it easier I did upside down triangles and pushed them away.


Step Seven:

Add the eyes and the fin.    To add the eyes I carved sockets, added toothpicks and attached the blueberries.    Don't be fooled I struggled with this step.    I didn't want the sockets to be white, just carved enough to look like the picture from the other tutorials.    I struggled to get it to look like what I wanted it to.    Just remember it's going to have a blueberry on top anyways so it doesn't have to be perfect!    I carved the gills the same way, but decided they were too time consuming and only did them on one side of the shark.    You don't have to do this step. If you wanted you could also draw them on the shark with a sharpie.    Keep in mind anything you do on the outside is fine since it's not going to be eaten.

Remember the mouth you put aside earlier?    Cut a triangle and attach it to the back of the watermelon with a few toothpicks to make the fin.


Step Eight:

Put the watermelon (guts) back into the watermelon.    I also added other melons at the bottom.    You can add blue berries strawberries etc.    Just make sure you add the watermelon guts on top.

Then I added the Swedish fish in the teeth, and all around the plate.    In this step you could add the blue jello at the bottom of the plate and put the shark right on top.    I skipped this step due to lack of time.


Hope you like it! :)    We had a blast at our Clam Bake and the shark was a fun way to start off the party.   It was hot and humid outside and the watermelon was refreshing.